スタバなどの無料WiFiにつなげる時は念のため自宅にあるバッファローのルータに最初から付いていたVPNを長らく使っていたのですが、macOSがSierraになったころからPPTPが非対応になってしまいました。別途クライアントを入れればPPTPを使い続けることはできるのですが、最近では暗号化も128bitでは心許なくなってきたこともあり、別の手段に切り替えることに。
今回はOpenVPN を採用することにしました。 いくつか候補はありますが、外出先で特定のポートが塞がれていたり、プロトコルに制限が課されている可能性を考えると、TLS+443番であたかもHTTPSをしているかのように見せかけることができるのが大きかったです。接続先はバレちゃいますが通信内容自体は秘匿されるので大抵の環境で弾かれることがありません。
構成
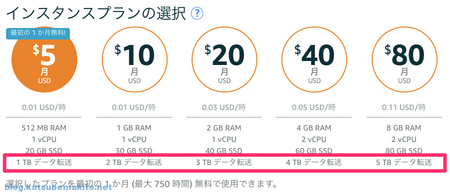
今回は個人的な用途なのでOpenVPN用のサーバにLightsailを使用します。VPN越しにインターネットに繋ぎに行くのでプロキシのようなイメージですね。
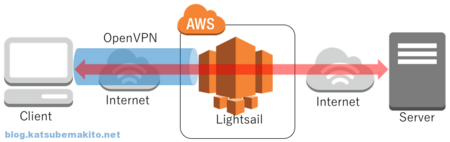
なお今回のクライアントはmacOS HighSierraになります。
インストール
Classmethod社さんの記事にまとまってましたので、これに沿って実施します。
OpenVPNのインストール
yumで一発です。
$ sudo yum install openvpn
今回は2.4.4が入りました。
$ openvpn --version
OpenVPN 2.4.4 x86_64-redhat-linux-gnu [Fedora EPEL patched] [SSL (OpenSSL)] [LZO] [LZ4] [EPOLL] [PKCS11] [MH/PKTINFO] [AEAD] built on Nov  1 2017
library versions: OpenSSL 1.0.2k-fips  26 Jan 2017, LZO 2.08
Originally developed by James Yonan
Copyright (C) 2002-2017 OpenVPN Technologies, Inc. <sales@openvpn.net>
認証局の作成
easy-rsaのインストール
執筆時点だと3.0.4が最新だったのでこちらを入れます。
$ wget https://github.com/OpenVPN/easy-rsa/releases/download/v3.0.4/EasyRSA-3.0.4.tgz
$ tar -xvzf EasyRSA-3.0.4.tgz
$ sudo mv EasyRSA-3.0.4 /usr/local/EasyRSA
$ cd /usr/local/EasyRSA/
初期化
$ ./easyrsa init-pki
認証局の作成
$ ./easyrsa build-ca
Generating a 2048 bit RSA private key
........................+++
.................................+++
writing new private key to '/usr/local/EasyRSA/pki/private/ca.key.XjDfbuAYXw'
Enter PEM pass phrase: (パスワードを入力)
Verifying - Enter PEM pass phrase: (パスワードを再入力)
-----
You are about to be asked to enter information that will be incorporated
into your certificate request.
What you are about to enter is what is called a Distinguished Name or a DN.
There are quite a few fields but you can leave some blank
For some fields there will be a default value,
If you enter '.', the field will be left blank.
-----
Common Name (eg: your user, host, or server name) [Easy-RSA CA]: (適当なホスト名などを入力)

CA creation complete and you may now import and sign cert requests.
Your new CA certificate file for publishing is at:
/usr/local/EasyRSA/pki/ca.crt
DHパラメータを生成
$ ./easyrsa gen-dh
Generating DH parameters, 2048 bit long safe prime, generator 2
This is going to take a long time
(中略)
DH parameters of size 2048 created at /usr/local/EasyRSA/pki/dh.pem
秘密鍵と証明書を作成
サーバ
$ ./easyrsa build-server-full server nopass
Generating a 2048 bit RSA private key
.+++
..+++
writing new private key to '/usr/local/EasyRSA/pki/private/server.key.N5M9yIFoh2'
-----
Using configuration from ./openssl-easyrsa.cnf
Enter pass phrase for /usr/local/EasyRSA/pki/private/ca.key: (./easyrsa build-caした際のパスワードを入力)
Check that the request matches the signature
Signature ok
The Subject's Distinguished Name is as follows
commonName            :ASN.1 12:'server'
Certificate is to be certified until Feb 23 10:43:41 2028 GMT (3650 days)

Write out database with 1 new entries
Data Base Updated
クライアント
$ ./easyrsa build-client-full client1 nopass
Generating a 2048 bit RSA private key
..........................+++
......................................................+++
writing new private key to '/usr/local/EasyRSA/pki/private/client1.key.Gl8a7rYnvp'
-----
Using configuration from ./openssl-easyrsa.cnf
Enter pass phrase for /usr/local/EasyRSA/pki/private/ca.key: (./easyrsa build-caした際のパスワードを入力)
Check that the request matches the signature
Signature ok
The Subject's Distinguished Name is as follows
commonName            :ASN.1 12:'client1'
Certificate is to be certified until Feb 23 10:46:14 2028 GMT (3650 days)

Write out database with 1 new entries
Data Base Updated
OpenVPNの設定
準備
前項で作成したファイル達を/etc/openvpn直下にコピー
$ sudo cp pki/ca.crt /etc/openvpn/
$ sudo cp pki/issued/server.crt /etc/openvpn/
$ sudo cp pki/private/server.key /etc/openvpn/
$ sudo cp pki/dh.pem /etc/openvpn/dh2048.pem
OpenVPNの設定ファイルの雛形を/etc/openvpnへコピー
$ sudo cp /usr/share/doc/openvpn-2.4.4/sample/sample-config-files/server.conf /etc/openvpn/server.conf
設定ファイルを編集
先ほどコピーしてきた雛形を編集します。
$ sudo vi /etc/openvpn/server.conf
port 443
proto tcp
dev tun
ca ca.crt
cert server.crt
key server.key  # This file should be kept secret
dh dh2048.pem
server 10.8.0.0 255.255.255.0
ifconfig-pool-persist ipp.txt
push "redirect-gateway def1 bypass-dhcp"
push "route 192.168.1.0 255.255.255.0"
push "dhcp-option DNS 208.67.222.222"
push "dhcp-option DNS 208.67.220.220"
keepalive 10 120
tls-auth ta.key 0 # This file is secret
cipher AES-256-CBC
persist-key
persist-tun
status /var/log/openvpn/openvpn-status.log
log         /var/log/openvpn/openvpn.log
log-append  /var/log/openvpn/openvpn.log
verb 3
explicit-exit-notify 0
OpenVPNの設定はClassmethod社さんの記事と変えています。
- 今回はSSL(HTTPS)通信っぽく見せたいのでポート番号を443、プロトコルをTCPに変更
- 通常は1194番
- UDPの方が高速に動作するようですが、体感的にはTCPで十分な速度が出ている印象
- TCPだと
explicit-exit-notifyは使用できないためオフに - すべての通信をVPN経由にしたかったので
redirect-gatewayの設定追加 - 外部へ通信をするためDNSサーバの設定追加
- ここではデフォルトのOpenDNSを使用。Googleの8.8.8.8や他のものでもOK
- ログ(openvpn-status.log, openvpn.log)を取るよう変更
あと push "route 192.168.1.0 ..."のIPアドレスとサブネットマスクの部分は、VPNサーバと同じネットワーク内にあるサーバなどに接続する際に使う項目なので今回は使用しませんが、VPNサーバのプライベートIPなどをごにょごにょとした物を書くなどしておいてください。
ta.keyの作成
TLSの認証時に使用するファイルを作成します。
sudo openvpn --genkey --secret /etc/openvpn/ta.key
パケットの転送を有効に
$ sudo vi /etc/sysctl.conf
net.ipv4.ip_forward = 1

### 設定を反映する
$ sudo sysctl -p
ログファイルの格納先を準備
$ sudo mkdir /var/log/openvpn
$ sudo chmod 0600 /var/log/openvpn
ルーティングを変更
VPNクライアントから受け取ったデータをインターネット上に送り出してやる設定をiptablesで行います。再起動すると設定が消えてしまわないよう、saveオプションを付けて保存するのを忘れないように。
$ sudo iptables -t nat -A POSTROUTING -s 10.8.0.0/24 -o eth0 -j MASQUERADE
$ sudo service iptables save
iptables: Saving firewall rules to /etc/sysconfig/iptables:[  OK  ]
OS起動時に自動で立ち上げる
$ sudo chkconfig openvpn on
OpenVPNを起動
$ sudo service openvpn start
ポートを開ける
Lightsailのコンソールから、インスタンスの画面を開き、「ネットワーキング」をクリックしたとことにある「ファイアウォール」の項目に、HTTPSを追加します。画面上で保存するのを忘れずに。
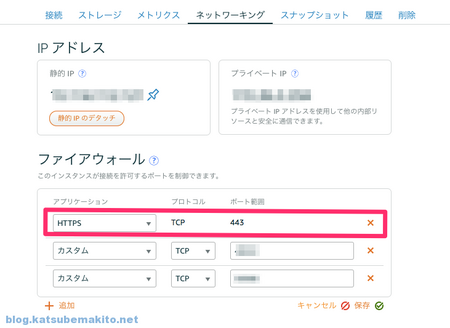
これでサーバ側の準備は一段落です。次はいよいよクライアントからつなげてみます。
クライアントから接続する
今回のクライントはmacOS HightSierraです。
必要なファイルをDL
クライアントの設定に必要なファイルをサーバ上でまとめておきます。最後にコピーしているclient.confはクライアント設定時に使用する雛形です。
### 一箇所に集める
$ cd ~; mkdir ~/client
$ cp /usr/local/EasyRSA/pki/ca.crt client/
$ cp /usr/local/EasyRSA/pki/private/client1.key client/
$ cp /usr/local/EasyRSA/pki/issued/client1.crt client/
$ sudo cp /etc/openvpn/ta.key client/
$ cp /usr/share/doc/openvpn-2.4.4/sample/sample-config-files/client.conf client/

### まとめる
$ sudo tar zcvf client.tar.gz client/
client/
client/client.conf
client/client1.key
client/client1.crt
client/ta.key
client/ca.crt
macOS上でTerminalを開き先ほどのファイルをダウンロード、展開します。
local: $ scp -P 22 ec2-user@example.com:~/client.tar.gz .
client.tar.gz                                           100% 6981    18.4KB/s   00:00

local: $ tar zxvf client.tar.gz
local: $ mv client ~/.openvpn
クライアントの設定ファイルを編集
先ほどダウンロードしたclient.confを適当なテキストエディタで開いて編集します。remoteには接続先サーバのIPアドレスかドメインを指定します。
client
dev tun
proto tcp
remote example.com 443
resolv-retry infinite
nobind
persist-key
persist-tun
ca ca.crt
cert client1.crt
key client1.key
remote-cert-tls server
tls-auth ta.key 1
cipher AES-256-CBC
verb 3
OpenVPNクライアントをインストール
macOS用のOpenVPNのクライアントソフト「Tunnelblick」をダウンロード、インストールします。サイトはいつの時代だってデザインですが大丈夫です、気にしないw
特別な事情がなければStable(安定)版を入れておいてください。
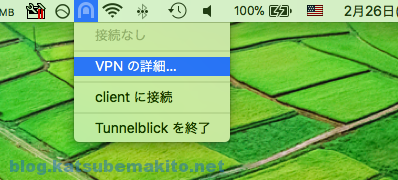
OpenVPNクライアント設定
Tunnelblickを起動するとメニューバーにアイコンが登場するので「VPNの詳細」を選択。
先ほど編集した「client.conf」をドラッグ&ドロップで放り込みます。ちなみに隠しファイル(フォルダ)は、Command+Shift+"."で表示できます。同じショートカットを再び入力すると非表示になります。
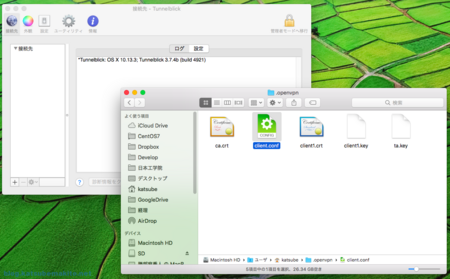
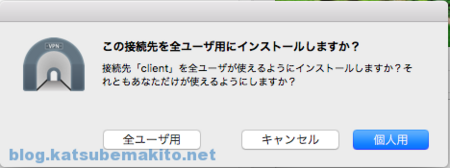
ダイアログが出てくるので用途に合わせて選んでください。私は「個人用」を選択。その後さらにパスワードの入力を求められるのでmacOSのパスワードを入れてください。これで先ほどのウィンドウは閉じて大丈夫です。
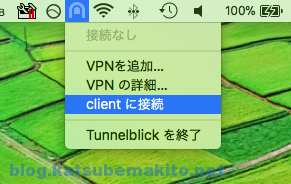
メニューバーから"client"に接続を選択。
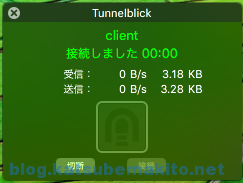
すると接続が実行され、最終的に成功のメッセージが表示されればOpenVPNによる接続が成功しています。
VPNを経由しているか確認する
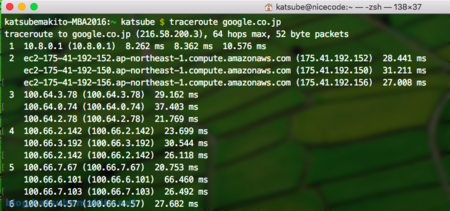
tracerouteを打ってみます。OpenVPNから割り当てられる予定のIPアドレス(10.8.0.1)から始まり、AWSのネットワークを経由して到着しているので大丈夫そうですね。
自分のグローバルIPも見ておきます。LightsailのグローバルIPと同じであればOKです。
local: $ curl ifconfig.io
xxx.xxx.xxx.xxx
ご注意
言わずもがなではありますが、Lightsailはプラン毎に定められた無料枠を超えて通信を行うと、転送量に応じて課金されますのでご注意を。調子に乗って4K動画とかをだら見してると軽く死にますw
以上です。
正直なところめっちゃ面倒ですねw 一度設定してしまえば後はサーバ側を触ることはトラブル時や設定変更時くらいなので気にならないのですが、証明書が関係する設定はいつになっても億劫ですw
また手が空いたらWindowsやスマホからのつなぎ方も書いて見たいと思います。 お疲れ様でした!
![ヤマハルーターでつくるインターネットVPN [第5版]](https://m.media-amazon.com/images/I/51K-TSfE-9L._SL500_.jpg "ヤマハルーターでつくるインターネットVPN [第5版]")
